CPR or pocket masks are vital devices during first aid activities — they create a seal over the victim’s mouth, allowing the rescuer to deliver oxygen during artificial ventilation. You can reuse a CPR mask up to twenty times after proper cleaning and disinfection. But how do you carry out this cleaning process?
Here’s how you can adequately clean and disinfect a CPR mask in four easy steps:
- Disassemble the replaceable parts from the CPR mask.
- Wash the CPR mask using soapy water.
- Submerge the CPR mask in a disinfectant.
- Air-dry the mask.
Keeping CPR masks clean and hygienic helps reduce the transmission of infection-causing microorganisms from a rescuer to the victim. This article provides a detailed guide on cleaning and disinfecting a CPR mask. But, before we dive into the cleaning procedure, let’s explore a few topics related to CPR Masks.
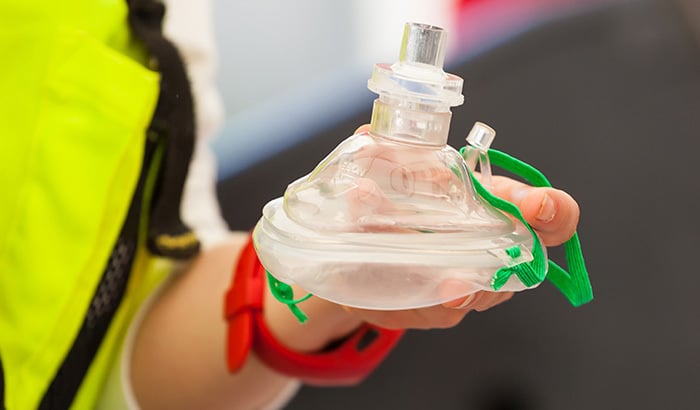
What Is a CPR Mask?
A CPR (cardiopulmonary resuscitation) mask is a specialized facemask used in first aid or pre-hospital rescue procedures. The mask comes in handy during unexpected medical emergencies, including cardiac arrests and respiratory failure.
Some people also refer to them as ‘Pocket Masks’ due to their portability, although it’s also a trademark name for a company that manufactures them.
A CPR mask comprises a face mask and two removable parts. These include replacement filters and valves. For instance, the AdSafe CPR Resuscitators are ergonomically shaped CPR masks providing leak-free performance. Their high-efficiency one-valve systems have low resistance to reduce cross-contamination.
So, how does a CPR mask work?
When placed on the victim’s (or patient’s) face, a CPR mask creates a tight seal between their mouth and nose. Hence, there’s no air leakage during artificial ventilation. Moreover, the air filter on the one-way filter valve prevents the entry of infectious pathogens into the recipient.
CPR masks are significantly efficient during rescue operations. An emergency responder (rescuer) can deliver up to 16% oxygen in one rescue breath. But, some modern CPR masks have built-in oxygen tubes, facilitating the administration of 50-60% oxygen.
Although CPR masks are not as effective as bag valve masks in oxygen administration, they are portable and reusable, making them a crucial part of rescue operations.
How To Use a CPR Mask
You can use a CPR mask in various rescue operations, including saving a drowning victim. Since these are emergency scenarios involving saving lives, it’s crucial to know how to use a CPR mask properly. Moreover, it would be best if you were conversant with first aid rules and emergency protocol guidelines.
Here’s how to use a CPR mask when resuscitating a drowning victim:
- Lay the victim on their back and apply chest compressions, depending on the severity of the situation and by following first aid guidelines.
- Check for neck injuries, and if there are none, tilt their head backward on the neck.
- Establish that the victim is lying in the correct position and ensure that your CPR mask is in perfect condition.
- Open up the mask if it has collapsed.
- Place the mask on the victim’s face, ensuring that the dome is well-positioned (the exhalation points should be away from the victim’s head and facing outward).
- Seal the mask by placing the wide chin-end between the victim’s lower lip and chin and ensure that the nose-shaped end (upper part) is over the victim’s nose.
- Apply the CPR mask over the victim’s head and press it gently (but firmly) around the edges to keep it intact.
- Open the respiratory valve and place it in your mouth without puckering your lips.
- Check the victim’s pulse and breathing before gently blowing air into the victim’s mouth.
- Observe their response after two ventilations.
- Wait for their chest to rise and fall before you blow in the air again.
- Repeat the procedure until the victim starts breathing.
- Wipe away any vomit or bodily fluids from the victim’s mouth using disinfecting masks.
NB: You should have one ventilation every five seconds for adults and three seconds for children (and infants).
How to Clean and Disinfect a CPR Mask for Reuse
CPR masks have a long shelf life, and you can reuse them up to twenty times. However, you need to clean and disinfect them properly before reusing them. Cleaning and disinfecting a CPR mask is crucial because:
- It removes dirt and infectious microorganisms present in the victim’s bodily fluids. Therefore, a clean, hygienic mask protects the rescuer from contagious illnesses.
- A clean and hygienic mask also protects future victims from encountering disease-causing pathogens while receiving the rescue breath.
- It makes the mask safe for reuse, reducing the cost of buying a new set.
Now, let’s look at the procedure of cleaning and disinfecting a CPR mask:
1. Disassemble the Replaceable Parts From the CPR Mask
As I mentioned earlier, a CPR mask has several parts, including some replaceable components. Hence you first need to disassemble the replacement parts from the face mask after using a CPR mask and before cleaning it.
To remove the replacement parts, follow these steps:
- Clamp the filter using your thumb and two fingers while holding the face mask with the other hand.
- Pull the filter gently and discard it.
- Remove the valve and discard it.
Note: The above procedure is suitable for cleaning the CPR mask after artificial ventilation in a real-life situation. You can reuse the valve after washing for a single user. However, this is only applicable when using CPR dummies (during CPR training).
If you’re cleaning a CPR mask after CPR training, you must first disassemble the mask from the CPR mannequin. Hence, you’ll have to remove the mask from the mannequin’s face connector. After that, you can follow the appropriate cleaning and disinfecting procedure.
2. Wash the CPR Mask Using Soapy Water
Washing a CPR mask is one of the vital steps you need to undertake before you reuse the mask. The process helps remove any visible dirt, including vomit or other body fluids from the victim. Furthermore, you can clean the CPR mask manually or automatically using cleaning equipment.
To clean the CPR mask manually:
- Warm some water to 60 – 70 ºC (140 – 158 ºF) and add a dishwashing liquid or a suitable cleaning detergent.
- Submerge the mask in warm soapy water for approximately 20 minutes.
- Wash the mask thoroughly using a soft-bristled brush to scrub the CPR mask (if necessary).
- Remove the CPR mask after washing.
- Rinse the CPR Mask in detergent-free water ranging from 30 to 40 ºC (86 – 104 ºF).
- Dry the CPR mask.
For automatic cleaning:
- Load the disassembled CPR mask into the dishwasher.
- Load the appropriate dishwashing liquid (or detergent) into your dishwasher.
- Choose the most suitable wash cycle and let the machine wash the CPR mask at 70 ºC (158 ºF).
Note: You can also clean the CPR mask automatically by using other multi-washer systems. These machines wash CPR face masks without degrading the masks using specific cleaning chemicals, including EW80 Mat and Sekumatic (1%). Examples include:
- Meiko Top Clean 60
- Meiko Top Clean M
It’s also crucial to note that you can’t clean CPR masks through steam autoclaving (sterilization) as this will destroy the masks.
3. Submerge the CPR Mask in a Disinfectant
After cleaning, it’s crucial to disinfect your CPR mask. Disinfection involves eliminating a majority of pathogenic microorganisms, except bacterial spores and non-living substances. And you can use a disinfecting solution or wet pasteurization to disinfect an object.
Now, sodium hypochlorite solution (liquid chlorine bleach) is the most common disinfectant in healthcare facilities. The solution has a broad spectrum of antimicrobial ability. Hence, you can also use it at home to disinfect various surfaces.
To disinfect the CPR mask:
- Add about 0.5% (¼ cup) of sodium hypochlorite into a bucket containing one gallon (3.7 liters) of water.
- Submerge the CPR mask and the valve stem into the liquid chlorine bleach solution.
- Let the CPR mask remain submerged in the disinfectant for 10- 20 minutes.
- Remove the disinfected CPR mask from the sodium hypochlorite solution and rinse it using warm tap water for about two minutes. The most preferred temperature range is 30 to 40 ºC (86 – 104 ºF). Rinsing will eliminate any remaining traces of the disinfectant.
- Discard the sodium hypochlorite solution since you need to prepare a fresh batch every time you want to disinfect a surface (or object).
Although sodium hypochlorite is the most preferred disinfecting solution, you can also use other chemicals to disinfect a CPR mask. For instance, some German companies manufacture disinfectants that disinfect face masks. These chemicals include:
- Bacillol AF
- Bacillol 30 Foam
- Box plus
- Dismozon plus
- Korsolex basic
- Kohrsolin extra
You can also use disinfectants from the EW80 System, including:
- EW80 des
- EW80 clean
4. Air Dry the CPR Mask
After cleaning, disinfecting, and rinsing your CPR mask, the final step is to air dry it before subsequent use. Air drying entails using air only to remove moisture from objects or surfaces. It is also the most preferred drying method for clothes, some raw materials, food products, and other substances.
The easiest and cheapest form of air drying is natural through laying out the mask in the open. But, you can alternatively use an air dryer to remove moisture from your CPR mask.
Final Thoughts
CPR masks are essential during artificial ventilation or CPR training. Although they are reusable, you must clean and disinfect them properly before reusing them. The cleaning procedure is straightforward and involves:
- Disassembling the replaceable parts.
- Washing the CPR mask in soapy water.
- Disinfecting the mask.
- Air drying the mask.
On the hunt for the perfect place to purchase your medical supplies? You’ll find everything you need at Allies USA, whether it’s a CPR mask, medical gloves, antiseptic wipes, or anything in between, we have the supplies you need to keep your practice stocked. Check out our selection today!
Sources
- Wikipedia: Pocket Mask
- Medscape: Bag-Valve-Mask Ventilation
- Allied USA: CPR Resuscitator Pocket Mask
- CDC: Cleaning, Disinfecting, and Sterilizing Self-Contained Self-Rescuer Mouthpiece Assemblies used in Hands-On Training
- CDC: Guideline for Disinfection and Sterilization in Healthcare Facilities
- Control: Sterilization for Beginners: The Inner Workings of a Laboratory Autoclave