Sterile gloves are a crucial component in every healthcare worker’s arsenal of protective wear. However, given how delicate the process of putting on a pair while wearing a gown can be, many professionals struggle throughout it, losing precious time in the meantime and getting flustered in a situation that requires a level head and steady hand. Luckily, by following a few simple steps, you’ll be able to put on your sterile gloves in no time properly.
Here’s how to put on sterile gloves with a gown:
- Decontaminate your hands.
- Tuck your gown’s cuffs.
- Carefully pick up the gloves.
- Put a glove on your non-dominant hand.
- Put the other glove on your dominant hand.
- Cover the wrists.
This article will take you through the most straightforward step-by-step approach of putting on sterile gloves with a gown. Moreover, I’ll provide you with some additional tips and considerations you’ll want to keep in mind throughout the process. By the end of this read, you’ll have learned all there is to know about mastering this technique.
1. Decontaminate Your Hands
A thorough scrub is of the essence in any situation where sterile gloves might be required. Therefore, before even opening up their package, take the time to decontaminate your hands thoroughly.
The principle of the surgical hand scrub is relatively simple; you’ll want to start cleaning your hands, working your way up to your forearms. However, while the premise of the process is relatively straightforward, its technique is what most might struggle with.
Before I take you through the step-by-step instructions regarding how to decontaminate your hands best, it’s important to note that you should be pretty strategic when it comes to the process.
For example, you’ll either have to count the number of strokes you designate for each finger and palm, or you should time your scrub to determine whether the cleaning process has been thorough enough.
Generally speaking, the average hand decontamination should take around five minutes. Here are the steps you’ll want to go through.
- Start with bare hands. This should go without saying, but you always need to preemptively remove all jewelry and accessories. Therefore, before turning on the faucet, make sure that you’ve removed the pieces of jewelry you often forget are there, including any rings, bracelets, or watches.
- Choose an antimicrobial soap. The type of soap you choose matters. Given that you’re trying to decontaminate your hands and rid them of any potentially harmful microorganisms, you have two choices: use an antimicrobial soap or scorching hot running water. The latter can severely damage and irritate your skin over time; therefore, always opt for the former.
- Scrub your hands. You’ll want to be as thorough as possible during this step. Make sure to clean between, over, and under each finger. Then, go over your palm and the back of your hand. The process should take roughly two minutes.
- Move on to your forearms. After you’ve sufficiently scrubbed both your hands, it’s time to clean your forearms. This step should take significantly less time, as they’re usually far less challenging to clean. However, while lathering up and scrubbing your forearms, ensure to keep your hand lifted high at all times. You don’t want the bacteria-laden soap to contaminate your freshly-clean hands.
- Move on to your arm. If necessary, don’t forget to clean up to three inches (7.62 cm) above your elbow.
- Repeat the process with the other hand and arm. As always, keep your hand raised to avoid any cross-contamination. If any area of your freshly-clean arms comes in contact with your surroundings, repeat the scrubbing process.
- Rinse carefully. When rinsing, slowly pass your hand through running water in the direction from fingertip to elbow. Avoid creating splatter at all costs.
- Move away from the faucet keeping your hands above your arms at all times. Never put your hands down without thoroughly drying them out first.
- Dry your hands and arms using a sterile towel. As always, avoid coming in contact with any non-sterile surfaces or surroundings.
2. Tuck Your Gown’s Cuffs
Even though there are a few techniques healthcare professionals may prefer to follow when putting on sterile gloves, in this article, I’ll be diving into the closed cuff method. This approach is much more efficient than its open cuff counterpart, as it eliminates the risk of contamination that results from the glove cuff rolling off the skin.
Therefore, if you’re new to the field and just learning how to wear sterile gloves with a gown, I highly suggest getting used to the closed cuff technique from the start. Doing so will ultimately save you from various potential hazards. Considering how little of your time this additional step will take, I see no reason why you should ever skip it.
You have to make an additional tuck on your gown’s sleeve. Manipulate your fingers inside the gown sleeve and move them so you’re able to fold the fabric under itself. However, be careful never to expose your bare hands while going through this process.
3. Carefully Pick Up the Gloves
Given that you’re working in a sterile environment, picking up your gloves is bound to be a bit more challenging than you’d think. For this reason, if you’re about to open the packaging, there are a few tips and considerations you should keep in mind beforehand.
Here are the steps you’ll want to follow to pick up a pair of sterile gloves correctly:
- Make sure that you’ve already prepared a sterile surface beforehand. After picking them up, you’ll use this surface to lay your sterile gloves on. Preemptively disinfecting a workspace will help you save a lot of time and trouble in the long run.
- Take your glove packet and place it directly on the sterile surface. By doing so, you’ll be sure that a slight slip or mistake won’t leave you having to repeat the process all over again.
- Once the packet is placed correctly, you can open it. Reveal the inner glove packet and open that as well. Always ensure to operate within the confines of your sterile workspace.
- Cover your hand with your sleeve. From this point on, you don’t want either of your bare hands to come in direct contact with the sterile gloves. Therefore, before proceeding, make sure to tuck your hands into your gown’s sleeve and only maneuver the gloves through it.
- Pick up the first glove by lifting them through its folded cuff edge. Repeat the process with its opposite counterpart.
- Lay the gloves flat on the sterile surface. Place the gloves palm down with their fingers pointing toward you.
Be careful never to directly touch any potentially contaminated exterior packaging throughout this process. Either have an assistant open the packaging for you or make sure it’s thoroughly disinfected before touching it. However, the inner packaging should be sterile enough to handle.
Alternatively, you can prepare the sterile surface and open the exterior packaging before scrubbing your hands. That way, avoiding hand-to-packaging contact will be much easier, as all you’ll have to do is lift the sterile glove off the packaging following steps 4-6.
Moreover, as soon as you open the package, only operate with your hands covered by your gown’s sleeve to avoid direct contact.
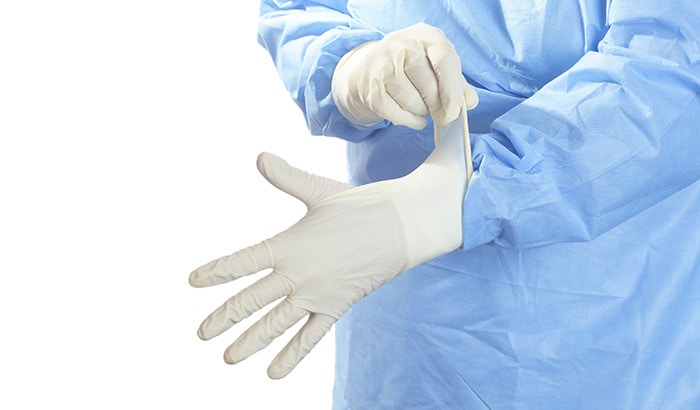
4. Put a Glove on Your Non-Dominant Hand
Now that the gloves are appropriately laid down on the sterile work surface, you can proceed to the most essential part of the process: putting them on. This might be the trickiest step, so make sure to pay the utmost care and attention throughout it.
There’s a reason why I’ve insisted on always starting with your non-dominant hand. Getting on that first glove without creating a point of contact between your bare hand and the sterile material can be tricky. For this reason, you’ll want to carry out this process using your most agile and controllable hand (which, in most instances, would be your right).
Here’s how you can put on a glove on your non-dominant hand using your dominant one:
- Cover your dominant hand with your gown’s sleeve. Given that this technique will inevitably pop up a few times throughout the process, make sure to practice tucking in your hand as much as possible. Having the procedure down might shave a few valuable seconds off your prepping time.
- Position your non-dominant hand. Hold it palm up, with the fingers sitting straight. Your fingers should be facing your body.
- Grab the glove by its cuff and situate it between your fingers. Your thumb and index finger should go in first, as they’ll be able to better maneuver inside the material, helping you situate the rest of your hand much quicker.
- Stretch the cuff over your hand. After adequately placing your fingers inside the material, grab the glove’s cuff with your gown-covered hand and stretch it as much as possible without risking a rip or breakage. Having enough material to work with will make the rest of the process a breeze.
- Adjust to situate properly. Now that the material covers your whole hand, you can start tugging and pulling until the sterile glove sits comfortably. Again, always operate through the tucked sleeve of your gown.
Throughout this process, make sure never to unroll the glove’s cuff. Always tug and maneuver it gently, as unrolling it will make the glove much more slippery, exposing you to a much higher risk of cross-contamination.
Additionally, never expose your bare fingers while going through these steps at the risk of sounding repetitive. I’ve mentioned this rule several times, but it bears repeating. The slightest slip could force you to repeat the whole process from the start.
5. Put the Other Glove on Your Dominant Hand
Now that you’ve already gloved your non-dominant hand, you should have a better idea of the process, which means this step should be a bit easier and less time-consuming.
However, you should still make sure to tuck your already gloved hand under your gown. Otherwise, you risk exposing the sterile material to your bare hands, which is what you’ve been trying to avoid all this time.
Repeat the same five steps mentioned in the previous section to glove your dominant hand. By the end of the process:
- Your hands should be fully covered.
- The material should feel comfortable on your skin.
- Your bare hand should never have come in contact with the gloves’ exterior.
6. Cover the Wrists
As the sterile gloves and gown safely cover your hands and arms, the only parts that risk being left exposed are your wrists. Therefore, before considering the prepping process over, tuck your cloves under your gown’s sleeves once again and give the gloves’ rolled edges another tuck.
Again, be careful not to unroll them completely when doing so. Then, lower the opposite gown sleeve until it fully covers the gloves’ cuff. Make sure to remove any possible creases and folds, and, more importantly, inspect the set-up to ensure there’s no exposed skin left uncovered.
Additional Tips
By now, the gloving process should be done. However, to ensure your protective set-up is as efficient as possible, there are a few additional tips and considerations you should keep in mind while going through the previously mentioned steps.
- Each new pair of gloves should be individually packaged in a sterile wrapper. Never use an unwrapped pair of gloves. Even if the pair has never been previously used, chances are it has been exposed to harmful microorganisms and contaminants that defeat the whole point of the process.
- Never drop your hands below the level of your sterile working space. You should always keep your hands in plain sight to keep them from accidentally coming in contact with their non-sterile surroundings.
- Never put your hands behind your back. The same reasoning applies here.
- Never reach across a non-sterilized area for an item. Your set-up is specifically designed to minimize any chances of contamination. The slightest wrong move could put you back to square one.
- Never touch an unsterile object with your gloved hands. This would be counterproductive and hazardous to both you and your patient.
Find the Right Gloves at Allied USA
Putting on sterile gloves with a gown is a process that requires care and patience. Keeping your hands sterile at all times while going through the steps quickly enough in a time-sensitive situation is a tricky balance to achieve. However, by going through these relatively straightforward steps and tips, you’ll be able to gear up in no time.
Here at Allied USA, it’s easier than ever to find high-quality medical gloves. With a wide variety of styles, brands, and sizes, you’re sure to find the gloves you need to be stocked at your medical practice. Browse our selection today!
Sources
- CDC: Healthcare Providers | Hand Hygiene
- Ansell: CLOSED DONNING TECHNIQUE FOR STERILE SURGICAL GLOVES
- Chicago Tribune: The benefits of antibacterial soaps
- MedLine Plus: Is handedness determined by genetics?